Dell Latitude 3420 - Build Your Own で Ubuntu プリインストールなノート PC を楽しむ
目次
経緯
過去には、 MacBook Pro (Retina, 15-inch, Mid 2012) で macOS と Xubuntu 19.10 Eoan Ermine をデュアルブートする や、 中古で12,800円の激安ノートPC(Jumper Ezbook 2)にXubuntu 20.04 LTS (Focal Fossa)を入れて幸せになる 、 Chromebook Acer Spin 311 に Emacs を入れて幸せになる に於いて、 手元の型落ち品や安価な PC を調達しての Ubuntu ノート PC 化を行なってきたが、 それなりのスペックで、 GNU/Linux 搭載前提の PC を調達したい欲が高まっていた。
そんな折、 Dell からなら Ubuntu プリインストールなノート PC を調達出来ることを Linuxノートパソコンが買える DELL製9機種 2021/09/25更新 - 全部楽しもう で知ったので、 購入を決めた。
調達
構成
今回購入したのは、14 インチの Latitude 3420 。
OS を Ubuntu Linux 20.04 にし、 CPU は Core i5-1135G7 に変更、メモリは 8 GB (1 X 8 GB) 3200MHz DDR4 非-ECC 、 電源ユニットを 65W Type-C アダプター に変更、 また、 電源ボタンを指紋リーダー付き に、 キーボードを US 配列(バックライト付き) にそれぞれ変更した。
なお、バックライト付きキーボードは US 配列でないと選択出来ない。 US 配列使いでよかったと思う瞬間である。
さらに奮発すると、 タッチディスプレイにも出来る ようだったが、 今回はそこまではやらなかった。
注文時点(2021年8月2日)では上記の構成で税抜き140,500円、クーポン適用で23,183円引きの119,426円となり、 最終的に 税込131,368円 となった。
特段、お安いワケではない。
なお重量は 1.52 kg 前後 。
MacBook Air(M1, 2020) が 1.29 kg、 13 インチ MacBook Pro(M1, 2020) が 1.4 kg、 16 インチ MacBook Pro が 2.0 kg ということなので、 いいセン行っているのではなかろうか。
配送期間
2021年8月2日に購入し、その時点では出荷予定日11月1日、到着予定が11月12日とあったが、 実際には9月8日に出荷され、9月22日に到着した。
昨今の情勢影響もあろうが、 注文から到着まで 2ヶ月弱 かかっていたことになる。 元々の予定では3ヶ月以上待つことになっていたので、大分短縮されて有り難いことではある。
セットアップ
今回のポイントは 指紋認証を有効にする 部分である。
それ以外は普通に Ubuntu をセットアップをすればのだが、 いつもは最初から Xubuntu を入れていたところ、今回は 後から Xubuntu 化 する、というのが異なる点。
Xubuntu 化
まずは、パッケージを最新化:
sudo apt update -y && sudo apt upgrade -y
次に、 Xubuntu を入れる。
sudo apt install -y --auto-remove xubuntu-desktop xserver-xorg-input-synaptics- light-locker-
Display manager は lightdm を選択した。
libinput と競合して、ウインドウによってナチュラルスクロールが効かくなるといった弊害があるので、 synaptics は最初から入れないようにする。
また、 xfce4-screensaver と light-locker も競合するので、light-locker の方を除外する。
xfce4-screensaver のロック画面の方が、指紋認証後直ちにロック解除されるのに対し、 light-locker の方は認証後に Unlock ボタンを押下する必要がある(lightdm-gtk-greeter と同じ挙動)という、 細かい挙動の違いがある模様。
続いて、タッチパッドのオプション設定を行う:
sudo mkdir /etc/X11/xorg.conf.d/
sudo tee /etc/X11/xorg.conf.d/30-touchpad.conf <<EOF
Section "InputClass"
        Identifier "libinput touchpad catchall"
        MatchIsTouchpad "on"
        MatchDevicePath "/dev/input/event*"
        Driver "libinput"
        Option "Tapping" "on"
        Option "TappingDrag" "on"
        Option "TappingDragLock" "on"
        Option "NaturalScrolling" "on"
        Option "DisableWhileTyping" "on"
        Option "ClickMethod" "clickfinger"
EndSection
EOF
オプション詳細は libinput の man(4) を参照。
続いて、キーボード設定を行う:
sudo localectl --no-convert set-x11-keymap us pc105 '' ctrl:nocaps
オプション詳細は keyboard の man(5) を参照。
ここまでで一旦再起動する。再起動後には Xubuntu 化されている。
sudo reboot
指紋認証の設定
本 PC に搭載されている指紋リーダーは以下の Goodix 製のもの:
lsusb | grep -i goodix
Bus 003 Device 002: ID 27c6:639c Shenzhen Goodix Technology Co.,Ltd. Goodix USB2.0 MISC
これは、比較的最近の 2020年12月にリリースされた libfprint v1.90.7 で対応されたばかり。
Focal Fossa (20.04) 向けリリース での最新は 1.90.2 だったので、そのままでは使えない。
Hirsute Hippo (21.04) 向けリリース に丁度 1.90.7 が上がっていたので、これをダウンロードして使ってしまう:
cd /tmp
wget http://launchpadlibrarian.net/530881082/libfprint-2-2_1.90.7+git20210222+tod1-0ubuntu2_amd64.deb
sudo apt install ./libfprint-2-2_1.90.7+git20210222+tod1-0ubuntu2_amd64.deb
インストール後、 fprintd-enroll を実行し、指紋を登録する。
https://askubuntu.com/a/1040609 を参考に、 pam-auth-update を実行し、 /etc/pam.d/common-auth を変更する。
このファイルは以下を実行すると分かる通り、共通設定になっている:
rg -l '@include common-auth' /etc/pam.d/ | column
/etc/pam.d/su			/etc/pam.d/sudo
/etc/pam.d/gnome-screensaver	/etc/pam.d/login
/etc/pam.d/xfce4-screensaver	/etc/pam.d/ppp
/etc/pam.d/chsh			/etc/pam.d/polkit-1
/etc/pam.d/other		/etc/pam.d/lightdm
/etc/pam.d/cups			/etc/pam.d/chfn
/etc/pam.d/cron			/etc/pam.d/gdm-password
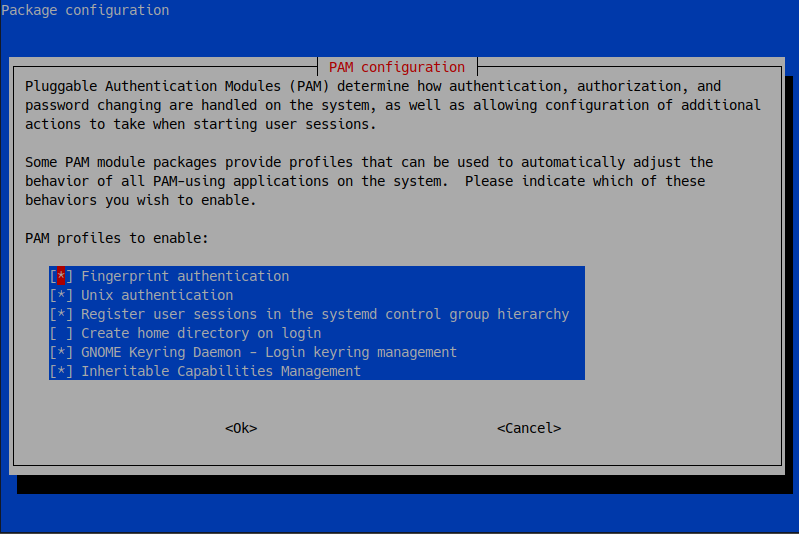
こんな画面が表示されたら、 Fingerprint authentication にチェックを入れて(スペースキー押下)、 <Ok> する( TAB で項目移動出来る )。
この操作により、以下のような記述が追加されることになる:
grep fprint -C 1 /etc/pam.d/common-auth
# here are the per-package modules (the "Primary" block)
auth	[success=2 default=ignore]	pam_fprintd.so max_tries=1 timeout=10 # debug
auth	[success=1 default=ignore]	pam_unix.so nullok try_first_pass
以上で、ログイン時や sudo する時など、大概の場面で指紋認証を使えるようになる。
注意点として、まず前述の通り起動後ログイン画面(greeter)では、 認証成功後に Unlock ボタンを押下する必要がある 。
そして、その「認証成功」のフィードバックが分かり辛い。 パスワード入力フィールドが無くなって、 Unlock 出来そうな雰囲気になったことを察知するしかない。
次に、 キーリングのロック解除には相変わらずパスワードが必要になる 。
これは、 After login in with Fingerprint reader on Lenovo Thinkpad prompted to enter password for unlocking the Keyring (#613) · Issues · GNOME / gdm · GitLab で 議論されている通り、基本的にはセキュリティ上意図された挙動な模様。 起動直後の一度きりの入力で済む話ではあるので、当座は受け入れている。
また、 指紋認証待ちである事のアピールが結構弱い ので、タイムアウトしがちである。
例えば、 sudo 時は標準出力に Place your finger on the fingerprint reader と控えめに出力されるだけだし、
Emacs で TRAMP を使い root 権限でファイルを開く ときに至っては、何も出力されない。
以上のような多少の不都合はあるものの、目を瞑れる程度ではないかと思う。
その他のセットアップ
以降は、特に本機だから行うというワケではないが、記録の為に残しておく。
まず何よりも先に、キーテーマを Emacs に設定する:
xfconf-query --channel xsettings --property /Gtk/KeyThemeName --set Emacs
最低限のキーボードショートカットを設定する:
xfconf-query --channel xfce4-keyboard-shortcuts --property '/commands/custom/<Primary>minus' --create --type string --set 'xfce4-terminal --drop-down --hide-menubar --hide-toolbar --hide-scrollbar'
xfconf-query --channel xfce4-keyboard-shortcuts --property '/commands/custom/<Primary><Alt>space' --create --type string --set 'xfce4-appfinder'
xfconf-query --channel xfce4-keyboard-shortcuts --property '/commands/custom/<Primary><Shift><Alt>dollar' --create --type string --set 'xfce4-screenshooter --clipboard --region'
キーリピート設定を変更する:
xfconf-query --channel keyboards --property '/Default/KeyRepeat/Delay' --create --type int --set 350
xfconf-query --channel keyboards --property '/Default/KeyRepeat/Rate' --create --type int --set 20
主に Emacs とコマンドライン系ツールの導入用に、 Guix を導入していく:
sudo apt install nscd -y
sudo su -
cd /tmp/
wget https://git.savannah.gnu.org/cgit/guix.git/plain/etc/guix-install.sh
chmod +x guix-install.sh && ./guix-install.sh
初回はめちゃくちゃ時間かかるので、進捗確認しやすくする為にプレゼンテーションモード(自動画面オフやロックをしない)にしておく:
xfconf-query --channel xfce4-power-manager --property /xfce4-power-manager/presentation-mode --create --type bool --set true
初回アップデート & 設定:
guix pull && \
    systemctl daemon-reload && \
    systemctl restart guix-daemon.service && \
    guix archive --authorize < /root/.config/guix/current/share/guix/bordeaux.guix.gnu.org.pub && \
    guix package -u && \
    guix install glibc-locales && \
    service lightdm restart
ここからは通常ユーザーでの作業。
引き続き Guix のアップデートと初期設定:
guix pull && guix package -u
guix install glibc-locales nss-certs curl
. ~/.guix-profile/etc/profile
コマンドラインツール群を導入:
guix install zsh git git:credential-libsecret rcm ripgrep fzf fasd tmux xclip direnv
. ~/.guix-profile/etc/profile
sudo apt install powerline -y
wget https://raw.githubusercontent.com/junegunn/fzf/master/shell/key-bindings.zsh -O ${HOME}/.fzf.zsh
git clone https://github.com/yewton/.dotfiles.git
cd .dotfiles/
RCRC=~/.dotfiles/rcrc rcup
rcup -t ubuntu
echo $(which zsh) | sudo tee -a /etc/shells
chsh -s $(which zsh)
ここで一旦ログアウト:
xfce4-session-logout --logout
ログイン後、Git の設定を行う:
git config --file ~/.gitconfig.local user.name yewton
git config --file ~/.gitconfig.local user.email yewton@gmail.com
git config --file ~/.gitconfig.local credential.helper = ${HOME}/.guix-profile/bin/git-credential-libsecret
Emacs のインストール & 設定:
guix install coreutils findutils texinfo emacs
. ~/.guix-profile/etc/profile
sudo apt install cmigemo -y
mkdir ~/.local/share/fonts
(export VER=2.5.1 && wget https://github.com/yuru7/HackGen/releases/download/v${VER}/HackGenNerd_v${VER}.zip &&
     unzip HackGenNerd_v${VER}.zip &&
     mv ./HackGenNerd_v${VER}/*.ttf ~/.local/share/fonts/ &&
     rm -fr ./HackGenNerd_v${VER}* &&
     fc-cache -fv)
git clone https://github.com/yewton/.emacs.d.git
Get the 1Password for Linux app に従い、 1Password のインストール:
curl -sS https://downloads.1password.com/linux/keys/1password.asc | sudo gpg --dearmor --output /usr/share/keyrings/1password-archive-keyring.gpg
echo 'deb [arch=amd64 signed-by=/usr/share/keyrings/1password-archive-keyring.gpg] https://downloads.1password.com/linux/debian/amd64 stable main' | sudo tee /etc/apt/sources.list.d/1password.list
sudo mkdir -p /etc/debsig/policies/AC2D62742012EA22/
curl -sS https://downloads.1password.com/linux/debian/debsig/1password.pol | sudo tee /etc/debsig/policies/AC2D62742012EA22/1password.pol
sudo mkdir -p /usr/share/debsig/keyrings/AC2D62742012EA22
curl -sS https://downloads.1password.com/linux/keys/1password.asc | sudo gpg --dearmor --output /usr/share/debsig/keyrings/AC2D62742012EA22/debsig.gpg
sudo apt update && sudo apt install 1password -y
asdf のインストール:
guix install gcc-toolchain readline zlib openssl libyaml
. ~/.guix-profile/etc/profile
git clone https://github.com/asdf-vm/asdf.git ~/.asdf --branch v0.8.1
. $HOME/.asdf/asdf.sh
for i in ruby nodejs golang; do asdf plugin-add $i; done
asdf plugin-add hugo https://github.com/beardix/asdf-hugo.git
asdf install
テーマを Numix に:
sudo add-apt-repository ppa:numix/ppa
sudo apt install numix-blue-gtk-theme numix-icon-theme-circle -y
xfconf-query --channel xsettings --property /Net/ThemeName --set 'NumixBlue'
xfconf-query --channel xsettings --property /Net/IconThemeName --set 'Numix-Circle'
xfconf-query --channel xfwm4 --property /general/theme --set 'NumixBlue'
Mozc 導入:
sudo apt install fcitx-mozc -y
im-config -n fcitx
sudo reboot
sudo apt intall xfce4-clipman-plugin -y
終わりに
ガッツリ作業にも使えるメイン Xubuntu 機を調達出来て満足。
今回の経験で問題無く使いものになることは分かったので、次回調達の機会があれば、 さらにスペックを上げたり、タッチディスプレイにすることにも検討したい。